|
|
Hints & Tricks 3: Working with Decals - decal softener &
future... |
 |
by Christian Jakl |
| |
| |
| |
 There are always a lot of questions asked about this issue. The market offers
so many various products and that does not make things easy. Even the different
quality of the decal sheets seems to let good advice appear very difficult.
It is likely that you're getting a model at the flea market that has been
off the market for a long time and in the box you will find a completely
faded decal sheet.
There are always a lot of questions asked about this issue. The market offers
so many various products and that does not make things easy. Even the different
quality of the decal sheets seems to let good advice appear very difficult.
It is likely that you're getting a model at the flea market that has been
off the market for a long time and in the box you will find a completely
faded decal sheet.
In the case of a tank kit, it might be easy to adjust but things are getting
trickier with an aircraft model where you want the edges to be unseen. "Wise
guys" might say they do not want to build out of the box and then they
are using decal sheets separately bought at a specialized dealer. But compared
to the model, these decal sheets are usually too expensive and you never
use all of them. Even if these sheets give you the option to build from
3 to 5 different types of variants, only a handful of modelers work that
way and do not change to another model. So the bought and leftover sheets
will be wasted or stored for such a long time that they might fade.
 Pre-work Pre-work
 The
spot where you want to place the decal must be smooth and polished. Most
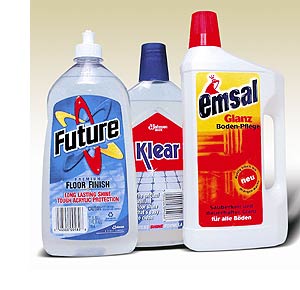
people start with a pre-coat of glossy varnish. The best way is to use floor
wax that you can get in any hardware store. The same can be used for polished,
glossy models like cars. In Austria and Germany, unfortunately, only the
brand ERDAL EMSAL is available although products like FUTURE and KLEAR from
the JOHNSON COMPANY are much better. The
spot where you want to place the decal must be smooth and polished. Most
people start with a pre-coat of glossy varnish. The best way is to use floor
wax that you can get in any hardware store. The same can be used for polished,
glossy models like cars. In Austria and Germany, unfortunately, only the
brand ERDAL EMSAL is available although products like FUTURE and KLEAR from
the JOHNSON COMPANY are much better.
Both are actually the same product - FUTURE for the U.S. and KLEAR for the
U.K. The environmental laws in Austria probably do not allow these products
to be offered on the market. However, if you should ever travel to one of
these countries, do not forget to bring back your own bottle. It will probably
last you forever. It can be put on very easily with the airbrush - just
be sure to take back some of the air pressure since the liquid is very thin.
Do not stay too long on one single spot because there is a chance of creating
drops. After about 20 minutes FUTURE and KLEAR will be dried and you can
carry on working. Do not forget to clean the airbrush with nitro enamel
or alcohol.
The advantage of using floor wax is the fact that it completely smoothes
on to the surface and eliminates even the smallest scratches and bumps.
Also, the see-through parts can be coated with floor wax and it will give
them a nice smooth surface. After such sealing, the weathering can be done
very easily with oil colors and turpentine. There will not be any danger
of damaging the varnished surface by turpentine and you can go on to the
final varnish with matte or glossy enamel. |
 |
| |
| |
Decal
Let us just ignore the quality of the decals for now. When a sheet is faded
so bad that it has almost turned brown, then there is not much hope to save
it. In any case, it is reasonable to always take your time while putting
on the images one by one. Here we will also find plenty of products available
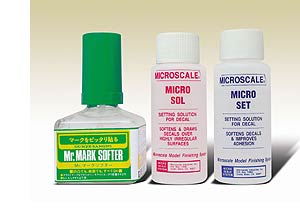
on the market. Two of them that I consider to be the best I would like to
feature in this article. Microscale offers two brands: SET and SOL. The
blue bottle (SET) is an absolute failure. When you open it you can immediately
figure out that it is nothing else but vinegar. So, SET can be abandoned.
Mix a spoonful of normal vinegar with warm water in a cup and put the decal
in it. It will get just enough kick to dissolve the sheet and will soften
it at the same time.
The spot on the model where the decal will be placed should be clean and
free of grease. Add one drop of water, MICRO SOL or GUNZE Mr. MARK SOFTER.
The GUNZE product is very good to soften slowly and carefully because it
gives you enough time to correct the position of the decal whenever necessary.
With SOL, you will have to work differently because it softens the decal
very quickly and, therefore, you have to make sure that the image is already
in the right position. One also should be aware that using SOL will cause
the decal to alter its shape and even get wrinkled. But, fortunately, these
unwanted effects will disappear after 15 minutes and the decal will automatically
smooth back on to the undercoat
Once both liquids have softened, the
decal will eventually break easily while trying to correct its position.
A toothpick can be used to press the decal into the correct shape. To accelerate
the drying process, an absorbent rag is recommended to dab off unnecessary
liquid. |
| |
| |
|
|
|
|
|
| |
|
|
|
|
|
| |
|
|
| |
| |
|
|
| |
|
|
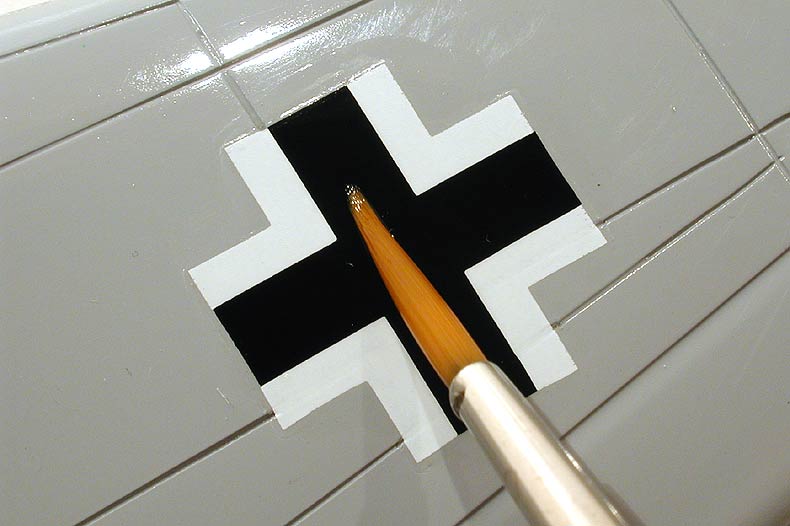
| Image 1: |
| Apply SOL only at the decal |
|
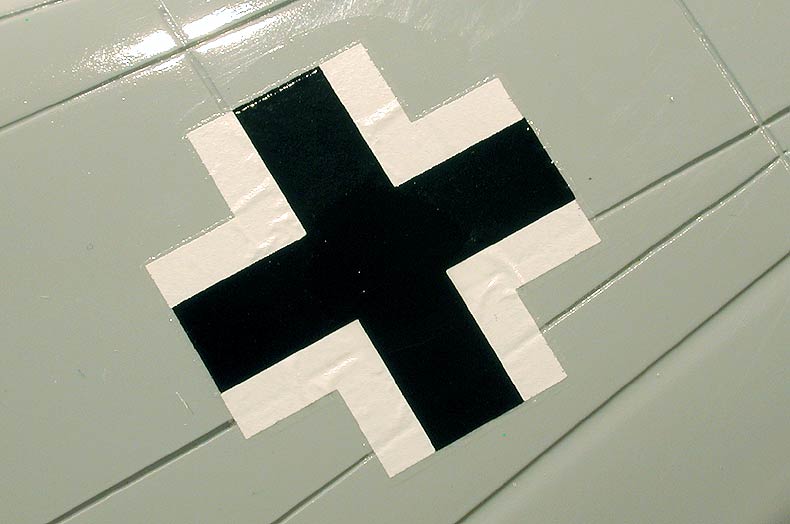
| Image 2: |
| the unwanted effect after some
minutes - don't worry, it will disappear... |
|
| Image 3: |
| and here is the result (the washing
was made only for better visibility) |
|
|
|
| |
|
|
|
|
|
|
Completion
The final results cannot be seen before the next day. In case these results
are not satisfying, MICROSCALE SOL brings up an additional plus: If the
decal did not settle in a joint or a rivet, you can patch that without difficulty.
Cut all along the joint with a sharp blade and puncture the rivets with
a needle in the way the decal will be pierced. After that you can put on
SOL once more and the whole process can start all over again. That way the
decal will be forced to settle into the cavities. After drying time, the
whole model can be coated with another layer of one of the floor waxes and
it also can be weathered all around the decals. |
|
|
|
|
|
|
|
| |
über den Autor |
|
|
|
| |
Christian Jakl |
|
|
|
| |
|
|
|
|
| |
1971 in Wien geboren, wohne ich jetzt inmitten der Berge Tirols. Ich bin im Marketing beschäftigt und befasse mich mit Grafikdesign und Layout. Über Schiffe, Automobile und Jets in meiner Jugend bin ich letztendlich bei den Flugzeugmodellen gelandet, Schwerpunkt deutsche und sowjetische Luftwaffe. Am liebsten beschäftige ich mich mit dem Dioramenbau in 1:48, da ich dort vieles selbst anfertigen und meiner Fantasie freien Lauf lassen kann. Das Ausprobieren neuer Techniken und Möglichkeiten Bausätze mit anderen Produkten zu kombinieren und mit verschiedenen Werkzeugen zu bearbeiten, habe ich mir zur Aufgabe gemacht - zu lernen gibt es ständig.
Es ist mir nicht wichtig ob das eine oder andere Detail an der richtigen Stelle sitzt, das Endergebnis muss stimmen. Wenn jemand vor einem meiner Modelle steht und begeistert ist, dann habe ich den Job gut gemacht. Das einzige Problem, und da werde ich wohl nicht alleine sein, ist der Zeitfaktor. Ich wünsche jedem viel Spaß mit dieser Seite und würde mich über Kritiken aller Art freuen.. |
|
 |
|
| |
|
|
|
|
| |
Email:  jakl.christian@gmx.at jakl.christian@gmx.at |
|
|
|
| |
|
|
|
|
|
|
|
|
 |
 |
This page: THEMES: Hints & Tricks 3: Working
with Decals - decal softener & future...
was last modified on: Oct 30, 2002
The URL of the page is: http://www.rlm.at/cont/thema11_e.htm
© Copyright www.rlm.at
and the contributing author(s). All Rights Reserved. Used with permission.
Terms of use: All material within this site is protected under copyright
and may only be reproduced for personal use. You must contact the Author(s)
and/or Editor for permission to use any material on this site for any purpose
other than private use! |
| |
|