|
|
Dirrty ! |
 |
Dioramas (1:35) built by Werner Kampfhofer |
| |
| |
I was always dreaming about hunting some of my built kits through mud. But
how to achieve that? How to create the mud? Which material would cause me
the least expense?
I spent years, no joke, with experiments and different sorts of sand, which
in the end fizzled. I did not want to start working with flour as in my
opinion food is for consumption and not for modeling.
I was also searching for a colored base, where I could position my kit.
Finally I agreed with myself upon a dark brown joint compound, normally
used to fill the gaps between tiles. I did not test this one in advance,
a fatal error which I realized almost too late... |
| |
| |
| |
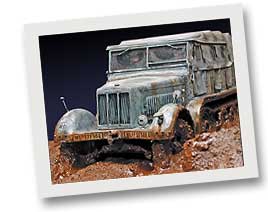
Diorama: 9. Flakdivision, Flakregiment 37, Russia - Mariupol Area,
March 1942 |
But first of all I had to find an object which I could dip into the compound
and decided to use Tamiya's Sd.Kfz.7 with 8,8 Flak 36. I thought of a scene
in spring, shortly after the snowmelt. Thus I built a canvas around the
crew compartment of the Sd.Kfz.7. This sort of protection can be seen on
many pictures and I cur it from aluminium foil. A lot of detail had to be
added in the area of the clutch, as the kit is rather spartan in this area.
The other amendments, based on drawings and photographs were quickly added.
This time there was no need to care about the accuracy of the running gear
and tracks! I could use the kit parts which would be drowned in mud shortly.
Much more attention has to be paid to the 8,8 Flak as there are lots of
things to add and refine and there were moments I wanted to scrap the whole
thing. Especially the Sd.Ah. 142 has been neglected from Tamiya badly and
adding the tools and their supports was the easy part. Installing the pneumatic
pipes for the brakes correctly became my personal challenge! Finally I found
the relevant reference material. I also used the kit wheels. To resemble
mud on the vehicles I used Revell putty and smeared it on the undercarriage.
Finally it turned out to be a waste of time as most of the dirt remains
invisible. |
 |
 Painting Painting
I added the winter camo with white Guache paint on the acrylic base which
allows to simulate wear, tear and scratches rather easily with wet cotton
swabs and tooth picks. To avoid any unwanted damage from sticky fingers
a layer of Gunze Sangyo H20 is required.
The
base
The diorama is located on a picture frame and the scenery is built up from
Styrofoam. I cut out the desired grooves and dry fitted the kits. While
adding the first layer of compound I knew that it would not work as it was
too coarse. I was wise enough and did not built in the vehicles. Nevertheless,
I was in panic, as the material created bubbles and started to lacerate
during the drying time. Once dry I corrected the errors but then the vehicles
did not fit anymore! The joint compound distended and changed the size of
the grooves. Tile compound, mixed with wallpaper paste turned out to become
my life saver. I colored it with brown dye, poured it over the diorama,
fitted in the vehicles and tried to create a realistic muddy road.
It is essential to resemble a wet and slowly moving mass which required
a lot of patience as the wallpaper paste did not dry quickly and whenever
I had sculptured a nice little wave, it flattened. I think it took me three
hours to get the desired shape. Although dyed the mud did not look convincing
and I had to paint it with a mixture of brown enamels and Italeri gloss
varnish (very expensive, but convincing!). But, the base was soaking the
paint which then turned flat on several areas. Rework was required, not
once. I added the final layer of paint on the delivery day of the diorama
and until now it is still shining. |
|
| |
| |
| |
| |
Diorama: 1. Panzerdivision, Panzerregiment I, Brody Area - March 1944 |
Personally I thought that I would not have to deal with Tamiya's Panther
Ausf. A ( from 1969 ) anymore and concentrated on Dragon's Panthers. Situation
changed, when Tamiya's old buddy stranded on my workbench in early 2004.
The kit was already built and equipped with an IR sight for the commander.
My basic concept was to keep it in that version, just remove the awful Zimmerit
and add a new layer of paint. After some research I had to realize that
currently no trustworthy photographs of Panther Ausf. A with IR equipment
are available and the eyewitness reports were too fuzzy for my taste. Thus,
new target: no IR, but an Ausf. A, made by Daimler-Benz in September 1943.
Removing the old Zimmerit turned out into a little nightmare and without
adding new Zimmerit the kit would have been lost. Daimler-Benz and MNH applied
the Zimmerit rather rude, so the effect on the kit was achieved on purpose
and not because of my poor skills. I cut out the MG-bow from the front hull
and closed the gap with plastic sheet. I used Revell individual tracks.
Idler and commanders copula are from Modeling Artisan Mori. The commanders
hatch is equipped with all periscopes and the elevating mechanism fort he
hatch cover. Some drivers and co-drivers periscopes had to be built from
scratch. For them I used parts from JLC. Tanks of this contract section
had an interlocked connection between sidearmor and upper hull.
With a bit of plastic sheet and putty these seams can be resembled rather
easily. The other parts were mostly cannibalized from Italeri's Panther
Ausf. D. Someday I want to build a Flakpanzer Coelian prototype with this
kit, thus a lot of parts are unnecessary and can be used for other projects.
The etched parts are from Eduard, SMAP and ABER and while adding the tiny
chains I asked myself more than once about the reason for doing this. I
removed the excess of the superglue with a stiff brush, cotton tabs and
liquid for removing superglue. Unfortunately this liquid is evaporating
rather quickly and one has to speed up.
The truck is from PSP and apart from one badly molded area in the front
platform gate quite OK. I real mess is the fact that neither tarp hoops
nor a tarpaulin are supplied with the kit. Especially on French trucks these
are very delicate and difficult to resemble. I helped myself with a Vacu
canvas from a Hobby Schmidt kit, although it was 2mm too short in length.
Some layers of plastic sheet helped me to overcome this obstacle. Then I
tried to represent a more realistic surface by adding a layer of Andrea
Putty. It was in vain, as I did not manage to get the putty smooth and thin.
So I had to rely on alu foil once again. |
|
Painting
I used white Guache for the winter camo too. After I sealed it, I added
chipped paint with Vallejo Air Panzer Grey and resembled wear and tear with
different oil colors.
The
base
The same materials as in the previous diorama were used. As the base should
not become that muddy this time, an average usage of gloss varnish was recommended.
The tree is based on a dead bonsai, the twigs were built of sepiolite and
then the whole thing was painted.
The
figures
I have chosen, arranged, built and primed all figures. They were painted
by Christoph Heugl, who is using Humbrol and Revell enamels. |
|
|
|
|
|
| |
Books / References: |
|
|
|
|
| |
|
|
| |
Achtung Panzer: Panther
Panzer Tracts 5-2: Panther Ausf. A
Waffen Arsenal S24: Panther im Einsatz
Spielberger: Panther und seine Abarten
Panzers in the East (2): Decline and defeat 1943-45
Panzer Colours 1-3
Internet |
|
| |
|
|
|
|
|
|
|
|
|
|
|
|
|
| |
meet the modeler |
|
|
|
| |
Werner Kampfhofer |
|
|
|
| |
|
|
|
|
| |
Hi, I am Werner Kampfhofer, born 1963-03-05
in Vienna. I live there with my wife, my son and currently 3 dogs. My modelling career started at the age of nine and a plane
from airfix. What began sporadically, turned into manic over
the years (that's at least the opinion of my wife).
My main focus are AFV in 1/35, without a historical limit and
I have no objections against kits from other branches. I always
try to get out the best of me and thus modelling is not fun
for me anymore, it is work, but a work I enjoy. |
|
 |
|
| |
|
|
|
|
| |
Email:  tankbuster@chello.at tankbuster@chello.at |
|
|
|
| |
Web: www.wk1963.at |
|
|
|
| |
|
|
|
|
|
|
|
|
 |
 |
This page: GALLERY: Dirrty! - Dioramas built by
Werner Kampfhofer (1:35)
was last modified on: Jul 22, 2005
The URL of the page is: http://www.rlm.at/cont/gal13_e.htm
© Copyright www.rlm.at
and the contributing author(s). All Rights Reserved. Used with permission.
Terms of use: All material within this site is protected under copyright
and may only be reproduced for personal use. You must contact the Author(s)
and/or Editor for permission to use any material on this site for any purpose
other than private use! |
| |
|


